What is source code management?
Source Code Management could be defined as the process of tracking modifications in the code of a software solution. It’s worth noting that Source Code Management and Version Control refer to the same thing. You’ll come across “SCM”, “VCS”, “Source Control”, “Version Control”, “Revision Control”, etc. interchangeably, in the context of software development.
Though time, many systems addressing this exact problem were made. One of them was Git, a very popular VCS used by a large population of developers across the world. Git is known to be a distributed version control system. In opposition to a centralized VCS, a distributed VCS doesn’t keep the history of modifications of the source code in a single centralized repository, but rather keeps a filesystem copy on each developer’s computer – meaning every developer that cloned the project has the full history stored on their own hard drive.
Git is a technology that can be used to track changes to a project and to help multiple people to collaborate on a project. At a basic level, a project version controlled by Git consists of a folder with files in it, and Git tracks the changes that are made to the files in the project. This allows you to save different versions of the work you’re doing, which is why we call Git a version control system.
Git was created by Linus Torvalds to version control the work done on a large software development project called the Linux kernel. However, since Git can track changes to all sorts of files, it can be used for a wide variety of projects.
To summarize, Git is a version control system that you can download onto your computer that allows you to track the history of a project and collaborate with other people.
Installing Git
If you don’t yet have Git installed, you need to go to the Git site (link here) and download the version corresponding with your operating system.
Installing Git for Windows
Go to the Git website downloads page for Microsoft Windows https://git-scm.com/download/win. This page presents several ways you can download Git.
Once downloaded, we can run the exe file. Then, a wizard will guide us through the installation step by step. We’ll go with the default options here.
Once finished, Git should be installed and situated on your PC. Now, using the Command Prompt, or the Git Bash¹⁰ application, you can run the git command, with the --version flag to check the installed version:
git --versionInstalling Git on MacOS
There are a few options to install Git on MacOS. One option is using Homebrew and the other with an installer provided Tim Harper (git-osx-installer download | SourceForge.net). Here we are going to use Homebrew, if you want to use the other option go to the link (git-osx-installer download | SourceForge.net) and follow the instructions.
With Homebrew run the following command in the terminal window:
brew install gitAnd voilà, you have the latest version of Git installed in your MacOS, you can check the version:
git --versionInstalling Git on Linux
Depends on the distribution used, and its underlying package manager installing Git could differ. We’ll consider a Debian-based distribution here, and thus, use the apt-get command-line tool:
apt-get install gitAgain, depending on the OS configuration and version you need to add “sudo” before the apt-get command.
Once installed, run the version test command again:
git --versionHow to setup git in your environment
Before Git can be used in any development environment, we need to setup a user name and email for Git.
For that task we are going to open a terminal and run the following commands:
git config --global user.name mark
git config --global user.email mark@learningbot.tech
All Git command start with the git keyword, in this case we are doing a config operation. We’ve told Git that we’ll be working with the configuration actions.
Local and global configuration files
It’s worth mentioning that Git has local and global configuration files. The local configuration files can be found in the project repository you are working with and overrides the global ones and are used for configuring specific values for that current working project.
Note: It’s important to note that the changes made to the configuration with the git config command are local. If you want to make the configuration action globally, you need specify the --global flag explicitly.
The local file is located in the project path: .git/config
The global file is located under ~/.gitconfig on Linux, C:/Users/[UserName]/.gitconfig and $HOME/.gitconfig on MacOS
If at any point in your work you’d like to check which configurations apply to a specific project, in that project’s directory, you can run the following command:
git config --listThis command will list all the configurations that are currently being applied to the project, including both global and local ones.
To include the location to the configuration file that brings about the configurations you can run the same command with the --show-origin flag like this:
git config --list --show-originGit basics
Create a repository
For creating a git repository, we need to go to the project folder. For this example, we will create the project folder and then go to there.
mkdir my_project_with_git
cd my_project_with_git
Then we will initialize our Git repository with this command:
git initThat command will initialize the repository and will output the following:
Initialized empty Git repository in /home/mark/my_project_with_git/.git/We have initialized a Git repository. The folder now has another “.git” directory within it. This directory will contain all metadata to keep track of your project source code (and other project associated files) and perform version control. The new repository has a branch “master” (is the default branch name) that is going to have the first pointer for working with all the project files.
Adding files to the repository
Let’s now add some file to the project. First, let’s create a README.md file with a “Hello project with Git!” sentence in it:
echo " Hello project with Git!" > README.mdThen, let’s run the following commands:
git add README.mdThis command will ad the new README.md file to the tracked area of the Git repository. Now if we see the status of the project into Git wi need to run the command:
git --statusWe got the following result:
------------------------------------------------------------------------
On branch master
No commits yet
Changes to be committed:
  (use "git rm --cached <file>..." to unstage)
        new file:   README.md
What does this mean? Well first we need to explain what the different states for the files in the project regards git point of view. Each file in your working directory can be in one of two states: tracked or untracked. Tracked files are files that were in the last snapshot, as well as any newly staged files; they can be unmodified, modified, or stage. Tracked files are the files that Git knows about them (Where added to that state with the add command)
Untracked files are any files in your working directory that were not in your last snapshot and are not in your staging area.
Staging project files
If we change the added README.md file (for example adding “A new project for learn Git”) and then run the status command again we get the following result:
git statusOn branch master
------------------------------------------------------------------
No commits yet

Changes to be committed:

  (use "git rm --cached <file>..." to unstage)

        new file:   README.md

Changes not staged for commit:

  (use "git add <file>..." to update what will be committed)

  (use "git restore <file>..." to discard changes in working directory)

       modified:   README.md --------------------------------------------
The “README.md” file is now staged and will go into next commit. Always take in account the next important note 😁
If you modify a file after you run git add, you have to run git add again to stage the latest version of the file.
The staging environment, also called “staging”, is the new preferred term for this, but you can also see it referred to as the “index”.
The “git add” command.
But we can track a crescent number of files of our project. For that we need a better solution that simple git add README.md file_1.txt … file_n.txt, and track all the project files into our head.
A better option is to use file globs, and match by file extension:
git add *.mdHere, we’re saying to Git it should add all files with a .md extension to the staging area. Or we can combine all the file extensions that we are going to use:
git add *.mdHere, we’re saying to Git it should add all files with a .md extension to the staging area. Or we can combine all the file extensions that we are going to use:
git add *.md *.pyIn a real project, we work with various file types, and you don’t care about choosing the files to add, and you just want to add them all to the staging area.
This can be done either by providing the -A flag, a wildcard *, or simply a . to the call:
git add -AOr:
git add .Or just:
git addEither of this commands will add all the changes to the staging area, whether the files are indexed or not (both tracked and untracked). We should note that these are the shortened version of the --all option.
Committing changes
Once you’ve used the git add command to add all the files you want to the staging environment, you can then tell git to package them into a commit using the git commit command.
A commit is a record of what changes you have made since the last time you made a commit. Essentially, you make changes to your repo (for example, adding a file or modifying one) and then tell git to put those changes into a commit.
Commits make up the essence of your project and allow you to jump to the state of a project at any other commit.
Now we can commit our changes with the following command:
git commit -m "Initial commit: adding first project structure."This should output something like this:
--------------------------------------------------------------

l commit: adding first project structure."

[master (root-commit) 6b96878] Initial commit: adding first project structure.

 1 file changed, 0 insertions(+), 0 deletions(-)

 create mode 100644 README.md
That was our first commit containing the README.md file. We’ve created a file, added it to the “staging area”, and committed that change to the local repository.
You can avoid adding a message, by using:
git commit -m ""But this is highly discouraged, as it’s considered a bad practice. Each change should be explained when possible and maintain a good verbal record of each change in the project source code.
What are Git Commits?
A commit contains one or many changes in one or many files of the repository. It can vary from adding a line to a file, to removing an entire directory or adding and renaming files. A commit is just a “snapshot of your entire project, at that given time” in the project history. When you commit a change, you commit the state of the entire project, after making some changes.
What is the composition of a commit? Well, a few things are inside a commit action and they are:
- A unique ID, stored in the form of a hash. Each commit can be accessed and reviewed at any given time.
- The author of the commit.
- The timestamp the commit was created at.
- A commit message (the message that the user writes in the command), possibly in multiple lines, and that message has the information about the changes recorded in the commit action.
- A reference to a previous commit (except for the initial one, which has no previous commit action to point to.
- The changes we make (a copy of the changed files is referenced by a commit).
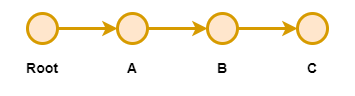
In resume we can say that a repository is a sequence of commits, as illustrated in the figure below:
Viewing a List of Commits
To see a list of commits in the commit history, you use the git log command. The git log command lists the commits in a local repository in a chronological order (reverse one). It displays information about each commit.
This information is formed by four pieces:
- A commit hash.
- The author name and their email address.
- Date and time (of the commit action).
- The commit introduced message.
You can use the log command:
git logAnd the result that’s shows in console can be this one:
commit c57f0cb456c5526dc47525784a3b9f10e3ab74b6 (HEAD -> main)
Author: mark <mark@gmail.com>
Date: Mon Jan 11 06:11:22 2023 +0210
adding first project structure
Here you can observe that:
- The git log output shows that you have one commit, the “adding first project structure” commit.
- The full commit hash of the commit is c57f0cb456c5526dc47525784a3b9f10e3ab74b6 (Your commit hash could be different).
- The date and time at which the commit was made are show in the command output.
- Below the date information is the commit message, which in this case is “adding first project structure”.
Conclusion
This post has provided a comprehensive overview of the Git version control system, covering essential topics to empower you with the knowledge needed to efficiently manage your source code. We began by exploring the concept of source code management and understanding its significance in collaborative software development.
The installation process for Git on various operating systems, including Windows, MacOS, and Linux, was thoroughly detailed to ensure a smooth setup for users across different environments. By following the step-by-step guides, you’ve acquired the skills to install Git and are ready to embark on your version control journey.
We delved into Git basics, guiding you through fundamental operations such as creating a repository, adding files, and staging changes. The git add command was elucidated, demonstrating how to prepare files for a commit. Understanding the anatomy of a Git commit, we explored the significance of versioning changes and committing them to the repository.
In mastering these essential Git concepts, you’ve laid a solid foundation for effective version control, enabling you to collaborate seamlessly with others and track the evolution of your projects.
As you continue your journey with Git, remember that practice is key, and each commit marks a milestone in the evolution of your codebase. Happy coding! 😀
If some one desires to be updated with latest technologies afterward he must
be go to see this web site and be up to date every day.
Hey people!!!!!
Good mood and good luck to everyone!!!!!
Hey people!!!!!
Good mood and good luck to everyone!!!!!
Hello.
I’m new here 🙂